


How Hard Is It to Stitch Two Screenshots Together? An iOS Long-Screenshot Engine That Made Me Start Over — Again and Again
How Hard Is It to Stitch Two Screenshots Together? An iOS Long-Screenshot Engine That Made Me Start Over — Again and Again
I spent several months doing one thing: making long-screenshot stitching on a phone align “just right.”
Sounds easy, doesn’t it? Take two adjacent screenshots, find the overlap, cut, and glue. But if you actually sit down and write the code, you quickly discover that “just right” is a bottomless engineering rabbit hole.
This post tears apart ScrollShot’s stitching engine. No product pitch, no vaporware promises — just algorithms and the engineering details that made me rewrite the design over and over. If you’re curious about ScrollShot’s overall positioning and use cases, you might want to start with the product overview: Why Choose ScrollShot for iOS Long Screenshots. Prefer Mac? Here’s the full guide: How to Take a Long Scrolling Screenshot on Mac.
Why Not Just Use OpenCV’s Panorama Stitcher?
Image stitching is an old problem, right? OpenCV’s Stitcher class can produce panoramas in a few lines of code.
But long screenshots and panoramas are two completely different beasts. A panorama is captured by rotating horizontally with perspective transforms and usually a small overlap region. A long screenshot is vertical, single-direction scrolling — consecutive frames share 5%–80% identical content, and — this is critical — a 2-pixel misalignment is immediately visible because you might be stitching text.
Anyone who has tried OpenCV on this probably shares the same war story: feature matching falls apart on chat screens. Some users set a background image in their messaging app, so most of the frame looks the same. Instead of the bottom of one frame overlapping the top of the next, SIFT features produce dense clouds of “similar but not identical” matches everywhere.
So I took a different path: I wrote the first line of a template matching engine from scratch, optimized specifically for the “vertical scrolling screenshot” scenario.
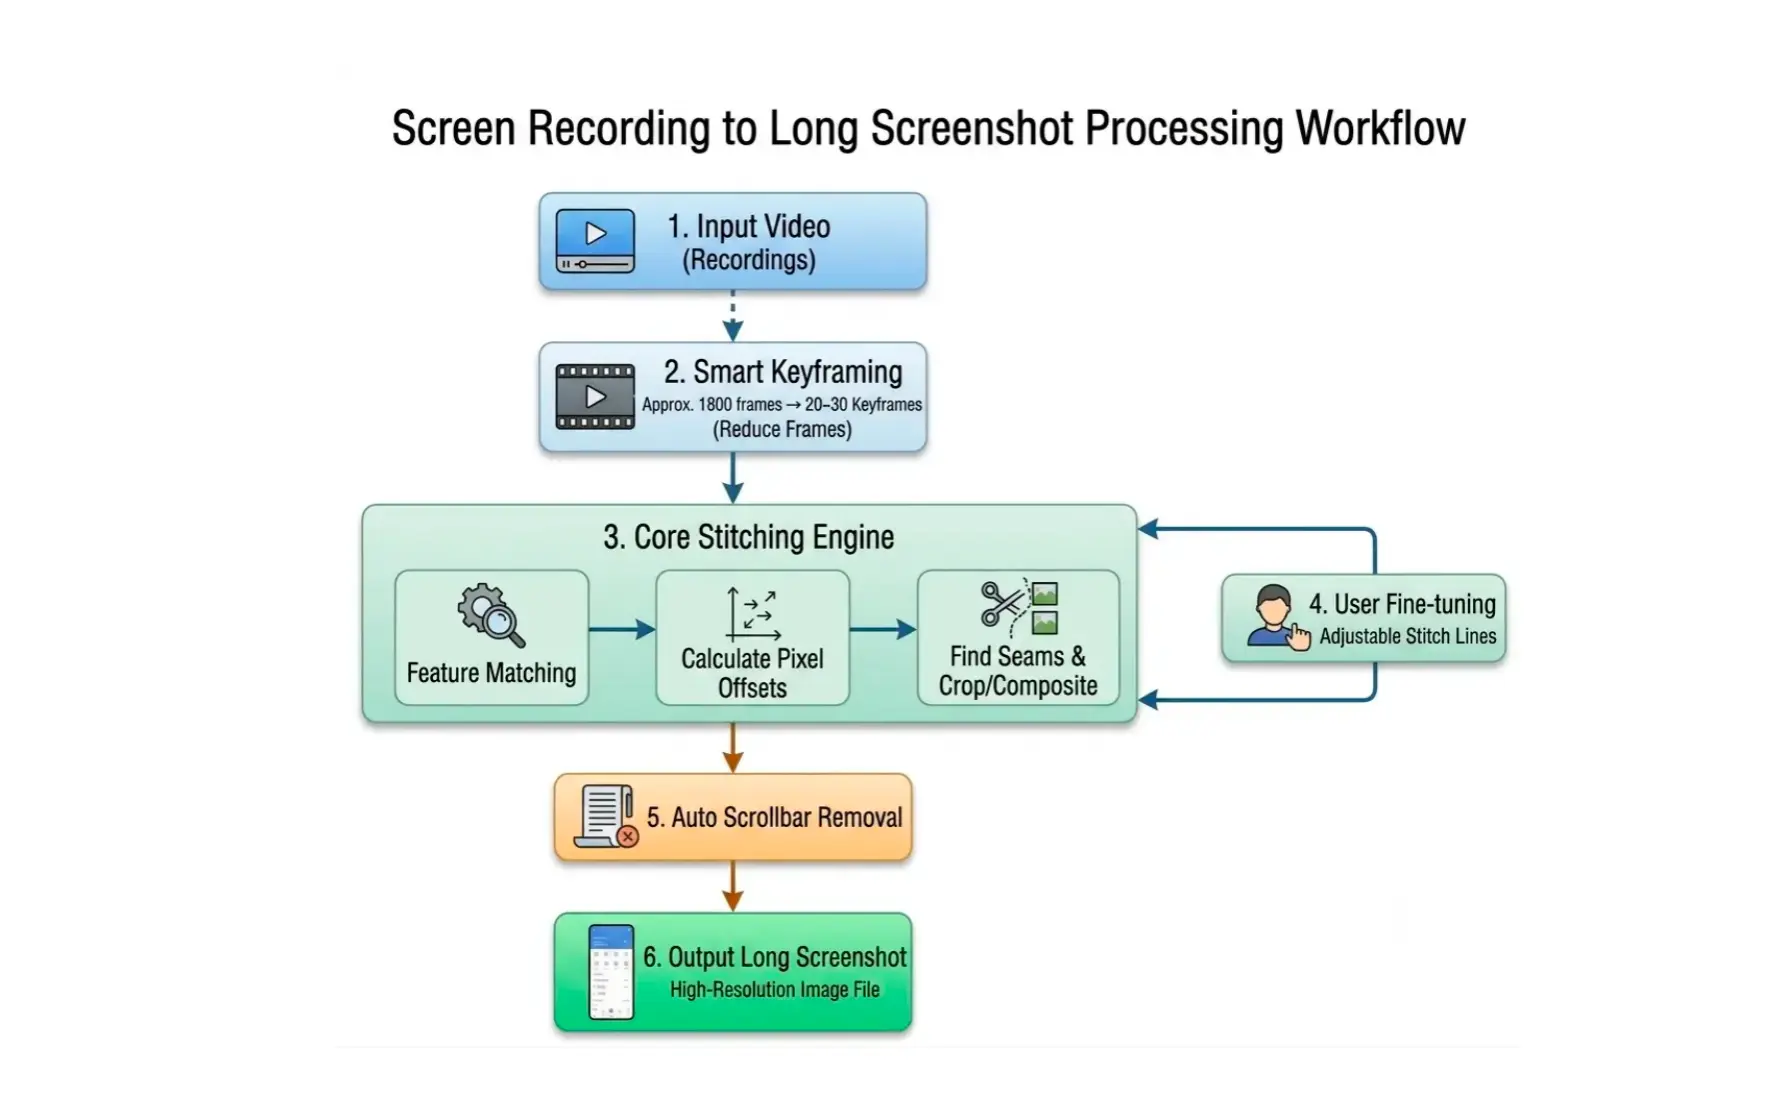
The overall pipeline looks like this:
The engine also supports Apple Vision Framework for matching (fast but coarse), but the rest of this post focuses on the in-house template matching — that’s where the real work happens. If you want to see how this algorithm ultimately translates into a record-once, get-a-long-screenshot experience, check out the product feature overview.
Challenge 1: Picking 30 Useful Frames from 1,800
A 30-second screen recording at 60 fps = 1,800 frames. Stitch all of them? You’ll blow up memory first, and your clock right after.
The most intuitive approach is equal-interval frame sampling: grab 3 frames per second. But this has a fatal flaw — users don’t scroll at a constant speed. During a fast flick, consecutive frames differ by half a screen, so stitching inevitably skips content. During slow browsing, adjacent frames are nearly identical — pure waste.
ScrollShot uses equal-distance frame sampling: instead of looking at time, it looks at “how far the screen has scrolled.” A frame is only worth capturing when the cumulative displacement exceeds a threshold.
What’s the right displacement threshold?
This number haunted me for weeks. Set it too small and slow scrolling triggers frantic frame extraction full of duplicates. Set it too large and fast scrolling skips content.
The final formula:
displacementThreshold = dsHeight × 0.60 × presetScaleWhere dsHeight is the downsampled video frame height (1080p downsampled 3× ≈ 360p, so dsHeight ≈ 640), 0.60 is the base ratio, and presetScale is a user-selectable preset (aggressive / balanced / conservative).
In balanced mode, that means a frame is captured every 384 pixels (640 × 0.60) of scrolling — roughly half a screen height.
There’s also an easily overlooked noise filter: a single displacement must be ≥ 3 pixels to count toward the cumulative total. Without this, sub-pixel noise from template matching accumulates slowly, causing “phantom frame extraction” even on a stationary screen. It took me an entire afternoon to track down this bug.
Two-pass scanning in practice
Pass 1 — low-resolution motion analysis. Video frames are downsampled 3× (1080p → 360p, an order-of-magnitude speedup), and lightweight template matching tracks vertical displacement frame by frame. Several engineering details are hidden here:
- Adaptive step size: When displacement is large, take big strides (
nativeFPS / 6, roughly every 10 frames). When displacement is small, fall back to per-frame scanning (nativeFPS / 30). When the remaining distance drops below 25% of the threshold, force the smallest step — otherwise you’ll literally step over a frame and miss it. - Scene change detection: If the SAD per pixel between adjacent frames exceeds 40.0, the user probably switched apps. Capture a frame immediately.
- Bounce-back truncation: Use Vision’s optical flow to detect motion direction. If cumulative displacement drops below -50px (the user is scrolling back up), they’ve reached the top — discard all subsequent frames. But this threshold can’t be too tight. I initially set it to -10, and minor finger jitter triggered truncation, cutting the recording in half.
Pass 1.5 — sharpness refinement. For each candidate frame, search a ±2 frame window around it and pick the sharpest one.
How do you quantify sharpness? I use Laplacian energy — convolve the grayscale image with a 3×3 Laplacian kernel, then compute the mean of the squared response:
kernel = [-1, -1, -1,
          -1,  8, -1,
          -1, -1, -1]

sharpness = mean((convolve(gray, kernel) - 128)²)
The -128 offset is because the convolution output carries a bias of 128 (a vImage requirement). Squaring and averaging gives you the high-frequency energy. Higher value = sharper frame.
Why Laplacian energy instead of Laplacian variance? Because for screenshot scenarios, I found that both methods select nearly identical frames, but the former is computationally simpler — vImage’s vDSP_vsq + vDSP_meanv, done in two lines.
The resolution cap for this pass is 720×1280, which is plenty. The reason is practical: the sharpest frame is the instant the user lifts their finger; frames during the swipe tend to carry motion blur. Laplacian energy is highly sensitive to motion blur — the difference is usually 2–3×.
The Core Algorithm: Template Matching Engine
This is the largest part of the entire engine by code volume (3,000+ lines in a single file), and the part that tortured me with bugs the longest.
Reverse Matching: Why search old frames from new?
My first version used “forward matching” — take a template from the bottom of the old frame and search in the new frame. It blew up on chat app screens: the bottom of the old frame showed one “OK” bubble, but the new frame had three “OK” bubbles. The match latched onto the topmost one, and the offset was off by 200 pixels.
Then I flipped the approach: Reverse Matching. Take the template from the top of the new frame (img2) and search the bottom of the old frame (img1).
Why is reverse better? Because the top of the new frame is “freshly scrolled-in content” — this content definitely exists in the old frame, and exists exactly once (in the middle-to-lower portion). Conversely, the “about-to-disappear old content” at the bottom of the old frame may only peek out slightly in the new frame, or may have already been pushed off-screen.
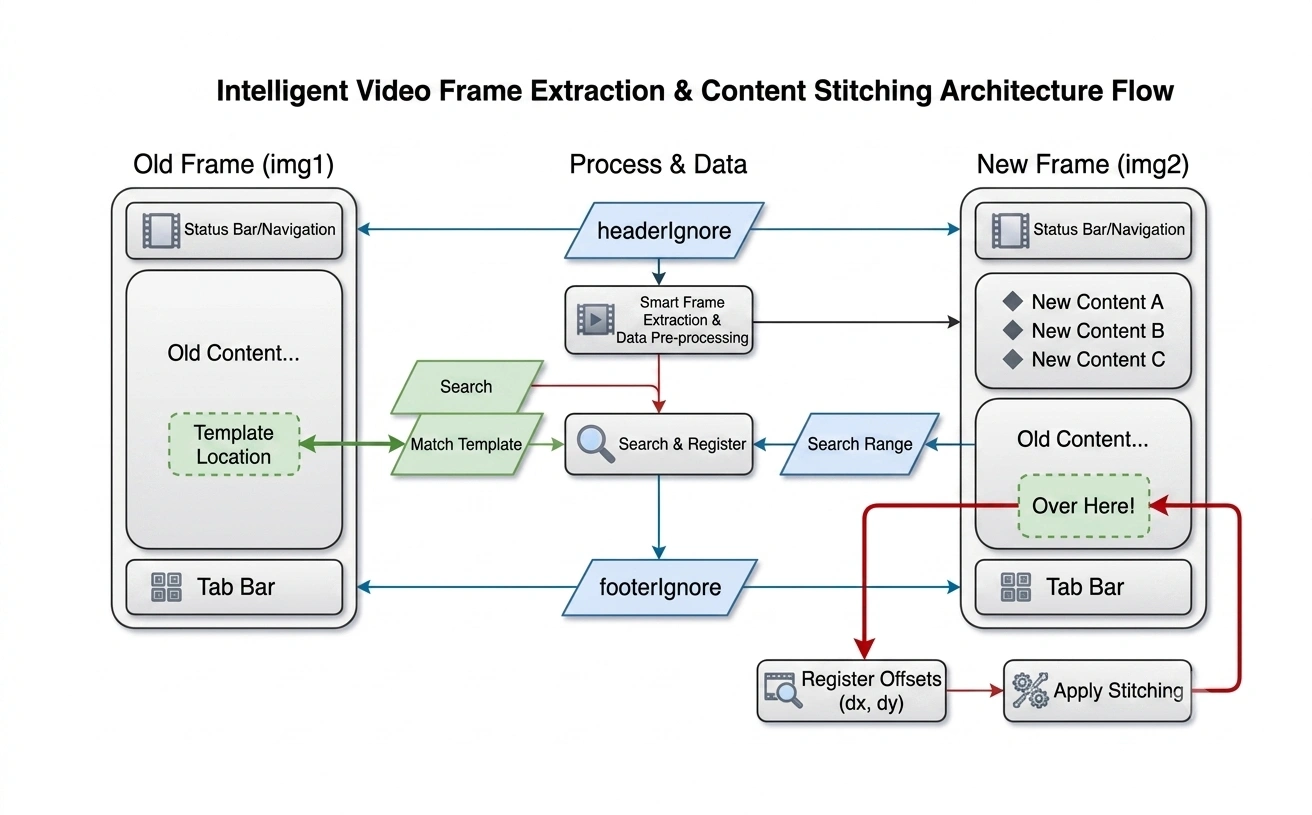
The search automatically skips the status bar area (top ~250px) and the bottom tab bar area (~350px). But here’s another pitfall — some apps have bottom navigation bars of varying heights, some pages have keyboards, some have floating buttons.
So I added dynamic footer detection. Here’s how it works: scan upward from the bottom of both frames row by row, sampling the central 80% of pixels per row (trimming 10% on each side to avoid floating buttons near the edges), sampling every 16 pixels, and computing the MAD (Mean Absolute Difference) between the same row in both frames. If MAD ≤ 3.2, the row is nearly identical in both frames — most likely a static UI element. Stop scanning after 4+ consecutive non-static rows (maxGapTolerance = 4). If fewer than 24 static rows are found in total, assume there’s no fixed bottom bar and return 0.
The 3.2 threshold is empirical. A static region with a pure white background typically has a MAD of 0–1.5. JPEG compression noise introduces fluctuations of 2–4. Rows with genuine content changes score at least 8. The 3.2 threshold sits right in the gap — tolerating compression noise while rejecting content changes.
Six templates vote against “they all look the same”
A single template patch is easy to mismatch. Imagine an e-commerce product listing page — every product card has an almost identical layout, so a single template might match the previous or next product.
The engine extracts 6 template patches simultaneously (each 100px tall, spaced apart from the top of the new frame), searches independently for the best match position in the old frame, and produces 6 offset values. Then it clusters those 6 offsets (tolerance: 5px) and takes the median of the largest cluster.
If 5 out of 6 templates point to offset ≈ 320 and 1 points to 800, that 800 is almost certainly a false match — just discard it.
There’s also an early-exit optimization: if the first 3 templates already agree (tolerance: 4px) and the offset isn’t close to 0 (ruling out “the user didn’t scroll at all”), skip the remaining 3.
Here’s a detail I agonized over: what tolerance to use? I initially set 2px, but because of NCC’s inherent quantization error (more on that later), offsets from different templates on the same frame pair often differed by 2–3px, so the early exit almost never triggered. After widening to 4px, roughly 60% of frame pairs triggered the early exit in real tests, with no observable loss in accuracy.
Pyramid NCC: Coarse-to-fine search
Each template match uses NCC (Normalized Cross-Correlation) to measure similarity. The NCC formula:
NCC’s advantage is insensitivity to overall brightness changes (a daytime recording and the same page in dark mode can still match). The range is [-1, 1], where 1 = perfect match. Intuitively: NCC doesn’t compare absolute pixel values — it compares whether the “pattern of light and dark variation” is the same.
But sliding pixel-by-pixel across the entire old frame is too slow. The engine uses a three-level pyramid search:
| Level | Step | Search Window | Candidates | Purpose |
|---|---|---|---|---|
| Level 1 (Pre) | 12px | Full range | ~125 | Rough positioning |
| Level 2 (Coarse) | 4px | ±32px | ~16 | Pinpoint to row |
| Level 3 (Fine) | 1px | ±4px | 9 | Pixel-level refinement |
A number worth sharing: Level 1’s step of 12 means searching only 1/12 of candidate positions, yielding roughly a 12× speedup per template compared to pixel-by-pixel search. The total computation across all three levels is about 1/8 of a brute-force full-range pixel-level search.
When candidates exceed 64 (typically during Level 1’s full-range search), GCD parallel computation kicks in automatically (DispatchQueue.concurrentPerform), distributing the search across multiple CPU cores. I hit a snag here: I initially used NSLock to protect a shared bestScore variable, only to find that lock contention on 6 cores actually slowed things down. Switching to per-thread local bests with a final merge reduced lock contention from O(n) to O(1).
Search window: Let history guide you
Searching the entire usable area of the old frame every time is both slow and prone to mismatches (the top and bottom of a page may have similar layouts).
The engine uses two kinds of “priors” to narrow the search window:
- Temporal prior: If the previous frame pair’s offset was 300px, this pair is probably similar — the user’s scroll speed doesn’t change abruptly. Narrow the search window to 300 ± 120px.
- Vision prior: For the first frame pair with no history, use Apple Vision’s image registration API for a rough estimate. Narrow the window to estimate ± 180px.
If the narrow window doesn’t yield at least 3 consistent matches (meaning the prior estimate was off), automatically fall back to a full-range search.
The “at least 3 consistent” criterion was also hard-won. I initially used “at least 1,” but when the Vision prior was significantly off (occasionally wrong by 500px), a false match in the narrow window happened to pass as valid. After raising it to 3, a false match would need to fool 3 independent templates simultaneously — statistically near-impossible.
When normal matching fails: A three-tier fallback
Real-world scenarios are far harsher than the lab. Floating buttons, semi-transparent overlays, playing videos, blinking cursors — all of these drag NCC scores down.
The engine implements a three-tier fallback strategy. I’ll use real data to show how often each tier triggers:
Tier 1: Strong match (~80% of frame pairs). Most templates score NCC ≥ 0.6 and agree on the same offset. The most common case.
Tier 2: Soft match (~12% of frame pairs). The best template’s NCC is only 0.45–0.6 — perhaps a floating UI element partially occluded the region. At this point, a full-overlap SAD (sum of brightness differences across all pixels) serves as secondary verification. Accept if SAD per pixel ≤ 26.0; reject otherwise.
Tier 3: 1D Profile NCC (~5% of frame pairs). “Flatten” the 2D image into a single row of per-row averages — a 1D array. Cross-correlate the two 1D curves. Roughly 100× faster, but with higher false-positive risk.
All failed (~3% of frame pairs)? This frame is likely a scene change or has zero overlap. Append it to the end without stitching.
Tier 2’s SAD verification is nuanced. The base threshold is 25.0 per pixel, but when the overlap ratio exceeds 80%, the threshold tightens adaptively:
if overlapRatio > 0.8:
    scale = max(minScale, 1.0 - (overlapRatio - 0.8) × 4.0)
    threshold = 25.0 × scale
Why tighten? Because the larger the overlap region, the more statistical samples SAD has, and random noise gets averaged out — a false match’s SAD can also trend low. Without tightening, false positives increase in high-overlap scenarios.
Regardless of which path is taken, there’s always a final offset refinement: compute SAD pixel-by-pixel within ±6px of the candidate offset and take the minimum.
Why does the NCC offset still need refinement? This took me three days to figure out. NCC is very “flat” near its optimum — an offset difference of 2px might only change NCC by 0.003. But SAD is extremely sensitive to ±1px shifts — a 1px difference can swing SAD by 3–5 units. The two complement each other: NCC handles coarse positioning, SAD handles pixel-level calibration. When you’re stitching text, a 2px error is the difference between “a line of text sliced in half” and “perfectly aligned.”
Seam line: Don’t cut text in half
You’ve found the offset. The two frames have an overlapping region. Where do you “cut”?
The intuitive approach is to cut in the middle. But if the middle happens to contain a line of large text, the top half and bottom half won’t align — the human eye catches it instantly.
The engine’s approach: compute the pixel difference for every row in the overlap region, then use a sliding window to find the position with the minimum total difference. The window height is adaptive — min(overlapH, max(100, adaptiveCutHeight)), where adaptiveCutHeight adjusts dynamically based on the ratio of overlap to offset. This position is where the two frames’ content is most similar, and placing the seam here looks the most natural.
Performance Benchmarks
I ran a typical 30-second chat screen recording (iPhone 15 Pro, 1080×2400, 60fps) through the engine. Key metrics:
| Metric | Value |
|---|---|
| Total frames | 1,800 |
| Pass 1 analysis time | 3.2s |
| Keyframes extracted | 26 |
| Pass 1.5 sharpness refinement | 0.8s |
| Template matching total time | 4.1s (25 frame pairs) |
| Average per-pair matching | 164ms |
| Early exit hit rate | 58% (15/25 pairs) |
| Strong match rate | 84% (21/25 pairs) |
| Soft match triggered | 3 pairs |
| 1D Profile fallback | 1 pair |
| All failed (appended) | 0 pairs |
| Final image size | 1,170 × 18,600 |
| End-to-end time | ~8.5s |
The pyramid search speedup is striking: Level 1’s step of 12 skips 92% of candidate positions, Level 2 computes only ~16 points in a ±32px narrow window, and Level 3 refines just ±4px. The effective computation across all three levels is about 1/8 of a brute-force full-range search.
Engineering Details You Can’t Ignore
You can’t load a 20,000-pixel image all at once
A long image stitched from 30 frames can be 1,170 × 24,000 pixels. Full-resolution RGBA in memory takes 112MB (1,170 × 24,000 × 4 bytes) — too much for an iPhone.
StreamingStitchingPlanner is designed as a streaming pipeline: during matching, only “current frame + previous frame” reside in memory. Stitching results are recorded as a set of Piece objects (source image index + crop region + target position). The final render decodes and draws in tiles.
Scrollbar removal algorithm
The stitched long image almost always has a residual scrollbar on the right side. The engine uses a gradient projection method to eliminate it automatically:
Take a strip 3% of the width from the right edge, compute the accumulated horizontal gradient → the scrollbar’s left and right edges form two gradient peaks (3–20px apart) → confirm the scrollbar’s actual position row by row → overwrite it with the adjacent pixels to the left. The same logic applies to horizontal scrollbars at the bottom.
Fallback UI when algorithms fail
Even the best algorithm will stumble sometimes. ScrollShot provides interactive fine-tuning on every seam line — users can drag up or down to adjust the stitch position with a real-time preview. Under the hood, FineTuneGeometryEngine ensures geometric constraints are always valid (you can’t drag a piece on top of another). The preview renders at low resolution for speed; export automatically switches back to full resolution. This controllability is also one of the core interactions of Manual Stitch mode.
Final Thoughts
The biggest takeaway from building this engine: the stitching algorithm itself isn’t hard. What’s hard is making it work on all the “unreasonable” real-world pages.
Chat app backgrounds all look the same, e-commerce product listings repeat infinitely, the iOS Settings app has vast stretches of pure white, and video platform thumbnails keep moving… Every single one is an edge case no textbook teaches and no paper writes about.
One bug stands out vividly: when recording the iOS Settings app, NCC’s offset was consistently off by about 40px. After lengthy debugging, I discovered the top of the Settings page has a huge white area. When the template lands on pure white, NCC scores near 1.0 at any white position — it simply can’t tell them apart. The fix: detect when a template’s variance is too low and skip it automatically — a pure-white template carries no information, so it’s better left unused.
Another time, even more absurd: recording the Bilibili homepage, a video thumbnail showed a cat that was moving. The thumbnail region was completely different between two consecutive frames, dragging NCC down to 0.3. No algorithm alone could save this. It was the 6-template voting mechanism that rescued it — the other 5 templates sampled static regions, and the vote still came out correct.
Solving these problems doesn’t come from more elegant math. It comes from one “let’s patch it for now” engineering trick after another. If you’re working on something similar, I hope this post helps you dodge a few of these potholes.
Further Reading
- Why Choose ScrollShot? The Ultimate Solution for Seamless Long Screenshots on iOS — A product-level look at how ScrollShot addresses iOS long-screenshot pain points, including auto stitching, manual stitching, privacy, and high-quality export.